
How to Upcycle Old Clothes with Embroidered Iron on Patches
Have you ever looked at your old pair of jeans or a worn-out jacket and wondered if there’s a way to bring them back to life? Upcycling with embroidered iron on patches is a fun and creative solution! Whether covering up a hole or adding a pop of personality to your old clothes, patches offer endless possibilities to express your unique style. Plus, it's an easy and budget-friendly way to update your wardrobe without parting with your favorite pieces.

For garments that are still structurally sound but have cosmetic issues, patches are a fantastic way to extend their life. Just make sure to wash and iron the clothes beforehand, so they’re clean and smooth, providing a good base for your patches.


Now that you’ve got the tools, tips, and inspiration, it’s time to get started! Dig through your closet, pick out those well-loved pieces that need a little TLC, and give them a new lease on life with some creative patchwork.
Why Upcycle Your Old Clothes with Embroidered Iron on Patches?
Upcycling your old clothes with embroidered iron on patches is not just being creative, it’s also smart and cheap with lots of benefits. Here are the reasons why you should use patches in upcycling your old wardrobe.1. Reduce Waste and Promote Sustainability
Every year, tons of clothing end up in landfills, contributing to environmental pollution. By upcycling, you’re helping to reduce this waste. Instead of discarding garments with small flaws or that feel outdated, you can transform them into something fresh and stylish.2. Save Money by Extending the Life of Clothes
Buying new clothes can be expensive, especially when you’re replacing items that have only minor issues like a small tear or a stain. Embroidered Iron on patches are affordable solutions to extending the life of your clothing. With little creativity, you can turn something you might have thrown away into a beloved piece.3. Personalizing and Updating Wardrobe Items
One of the best things about using patches is they make your clothes uniquely yours. Whether you’re into bold, eye-catching designs or subtle, minimalist accents, embroidered iron on patches let you personalize your clothing to fit your personality.How to Choose the Right Clothes for Upcycling
Before diving into your patching project, it’s important to pick the right pieces to upcycle. Not all clothes are created equal when it comes to patching, so here’s how to choose the best candidates for a stylish and durable makeover.Types of Clothes That are Suitable for Patching
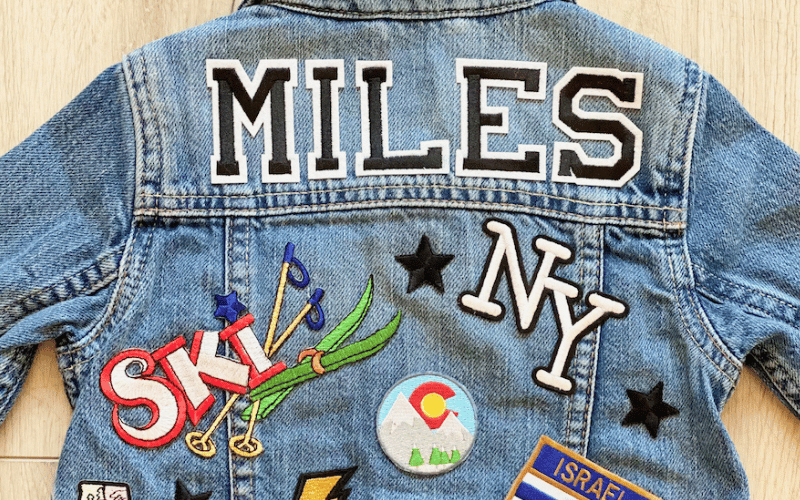
1. Jeans and Denim Jackets
Denim is practically made for patches. Its sturdy fabric provides the perfect canvas for both decorative and functional patches, making it ideal for upcycling. Whether you’re covering up a worn-out knee on your favorite jeans or adding a cool patch to the back of a denim jacket, this fabric can handle it all. Embroidered iron on patches on denim also give it a classic, laid-back vibe that never goes out of style.2. T-Shirts and Sweatshirts
T-shirts and sweatshirts are also great for patching. They’re perfect for adding small, fun patches that reflect your personality. Its lightweight fabrics can easily be transformed. Just keep in mind that thinner materials may require extra care when applying patches, especially if you’re using iron-on varieties.3. Bags, Hats, and Other Accessories
Bags, hats, and other accessories can benefit from a patch makeover, too. Adding embroidered iron on patches to a worn-out backpack or a plain tote bag can turn them into standout pieces. Hats, especially beanies, and caps, are another fun option to experiment with. These items are often made from durable materials, making them perfect for patches that can handle daily wear and tear.4. Evaluating the Condition of the Clothes
Before you start, take a close look at the condition of the items you want to upcycle. Small tears, stains, or frayed edges are perfect candidates for patching, as these can easily be covered or reinforced. But if the fabric is too thin, heavily worn, or damaged in multiple areas, it might not hold up well to patching.For garments that are still structurally sound but have cosmetic issues, patches are a fantastic way to extend their life. Just make sure to wash and iron the clothes beforehand, so they’re clean and smooth, providing a good base for your patches.
How to Select the Perfect Embroidered Iron on Patches
Choosing the right embroidered iron on patches is key to the success of your upcycling projects. With so many types and styles available, you can easily find embroidered patches that match your style and needs. Here’s a breakdown of the different types of patches and where to find them.Types of Patches
1. Iron-On vs. Sew-On
When it comes to applying patches, you have two main options: iron-on and sew-on.- Iron-On Patches: These come with a heat-activated adhesive backing, making them quick and easy to apply. All you need is an iron and a pressing cloth. They’re great for beginners or anyone looking for a fast, no-sew solution. However, they may not be as durable as sew-on patches, especially on items that will go through frequent washing.
- Sew-On Patches: As the name suggests, these require stitching, either by hand or with a sewing machine. While they take a bit more effort to attach, they offer a more secure and long-lasting hold. Sew-on patches are perfect for items that will see a lot of wear, like bags or jackets.
2. Embroidered, Printed, and Appliqué Patches
The style of patch you choose can completely change the look of your project.- Embroidered Patches: These are classic and often feature intricate designs with a raised texture. They add a touch of craftsmanship and can range from simple shapes to detailed images.
- Printed Patches: These have designs printed directly onto the fabric, offering a smooth and often more lightweight option. They’re ideal for more casual or playful designs and can feature anything from graphics to text.
- Appliqué Patches: These are fabric cutouts sewn onto the garment, often with decorative stitching. They’re great for adding unique textures and can be used to create layered or multidimensional effects.
Creative Design Ideas for Upcycling Clothes with Embroidered Iron on Patches
With embroidered patches, you can turn old clothes into wearable art or simply give them a new lease on life. Here are some creative design ideas to inspire your next project.1. Ideas on Patch Placement
- Covering Holes and Stains: One of the most practical uses for patches is covering up holes, stains, or other imperfections. Got a pesky tear in your favorite jeans? A well-placed patch will not only fix the problem but also add a stylish twist. Stains on a t-shirt or sweatshirt can also be easily hidden with a fun or quirky patch, transforming what was once a flaw into a feature.
- Accent Areas Like Pockets, Sleeves, and Hems: Adding patches to accent areas like pockets, sleeves, or hems can create a unique and stylish look. Imagine a small embroidered patch peeking out from the edge of a pocket or a series of patches running along the hem of a skirt. These can elevate even the simplest pieces, making them feel fresh and trendy.
2. Theme-Based Designs
-
Nature-Inspired
-
Vintage
-
Pop Culture
3. Customizing for Kids or Specific Interests
-
For Kids
-
Specific Interests

Step-by-Step Guide on How to Apply Embroidered Iron on Patches
Applying patches is easier than you might think. Whether you’re using iron-on or sew-on patches, this step-by-step guide will walk you through the process, and ensure your project turns out great.Preparing the Garment
1. Cleaning and Ironing:
Before you start, make sure your garment is clean. Wash it to remove any dirt, oils, or residue that could interfere with the patch adhering properly. Once it’s clean and dry, give it a good ironing. Cleaning ensures the fabric is smooth and free of wrinkles, making it easier to apply the patch evenly.2. Planning the Layout:
Next, decide where you want to place your patch. Lay the garment on a flat surface and try out different positions. This step is crucial for visualizing how the final piece will look. You can even use pins or tape to temporarily hold the patch in place and step back to get a better view. Once you’re happy with the layout, you’re ready to apply the patch.Applying Iron-On Patches
Tools Needed:
- Iron
- Pressing cloth (a clean piece of cotton fabric or a tea towel)
Step-by-Step Instructions:
- Heat the Iron: Set your iron to the appropriate temperature for the fabric (usually medium to high). Avoid using steam.
- Position the Patch: Place the patch on the garment, design side up, in the desired spot.
- Cover with Pressing Cloth: Lay a pressing cloth over the patch to protect it and the garment from direct heat.
- Press the Iron: Firmly press the iron onto the patch, applying even pressure. Hold for about 15-30 seconds, depending on the patch instructions.
- Check Adherence: Lift the pressing cloth and check if the patch is firmly attached. If the edges aren’t fully adhered, repeat the process for another 10-15 seconds.
- Let it Cool: Allow the patch to cool completely. This helps the adhesive set properly.
Sewing on Patches
Tools Needed:
- Needle
- Thread (matching or contrasting, depending on your design)
- Scissors
Hand-Sewing Method:
- Thread the Needle: Cut a length of thread, knot one end, and thread the other through the needle.
- Position the Patch: Place the patch in the desired spot and pin it in place if needed.
- Start Sewing: Begin sewing along the edge of the patch using a simple running stitch or whip stitch.
- Secure the Patch: Continue sewing all around the patch, making sure it’s securely attached. Tie a knot at the end and trim any excess thread.
Machine-Sewing Method:
- Prepare the Machine: Set up your sewing machine with the appropriate thread and needle for your fabric.
- Position the Patch: Place the patch and pin it securely.
- Sew Around the Edge: Use a straight or zigzag stitch to sew around the edge of the patch. Take your time to ensure even stitching.
- Finish Up: Once done, trim any loose threads and remove the pins.
Tips for Long-Lasting Results
Once you’ve applied your patches, you’ll want to ensure they stay put and look great for as long as possible. A few simple tips can go a long way in reinforcing your patches and caring for your upcycled clothes.1. Reinforcing Patches for Durability
Even the most carefully applied patches can benefit from a little extra reinforcement, especially if the garment will be used frequently or washed often.- Double Up on Stitching. If you’re using iron-on patches, consider adding a few stitches around the edges, even if it’s just a basic running stitch. This will help prevent the patch from peeling off over time, especially around the corners where it’s more likely to lift.
- Use Fabric Glue For an added layer of security, apply a small amount of fabric glue to the back of the patch before ironing or sewing it on. This creates a stronger bond and helps keep the patch in place through multiple washes and wears.
- Reinforce High-Stress Areas If you’re applying patches to areas that experience a lot of movement or wear (like elbows, knees, or seat of pants), consider using a stronger stitch, like a zigzag or double-stitch. This provides extra durability and helps the patch withstand daily wear and tear.
2. Washing and Care Tips for Patched Clothes
Proper care can significantly extend the life of your patched garments. Here are some washing and maintenance tips to keep them looking their best:- Turn Inside Out Before washing, turn your patched clothes inside out. This reduces friction on the patches and helps prevent them from snagging or peeling during the wash cycle.
- Use a Gentle Cycle Wash your patched garments on a gentle cycle with cold water. Harsh washing cycles and hot water can weaken the adhesive on iron-on patches and cause them to loosen.
- Avoid High Heat High heat can be the enemy of patches. When drying your clothes, opt for a low heat setting or air dry them instead. This prevents the adhesive from melting or the fabric from shrinking, which could distort the patch.
- Iron Carefully If you need to iron your patched clothes, do so carefully. Use a low heat setting and avoid direct contact with the patch. Place a pressing cloth over the patch and iron around it to smooth out the garment without damaging the patch.
-
Spot Clean When Possible
For minor stains or dirt, try spot cleaning instead of throwing the entire garment in the wash. This gentle approach reduces the need for frequent washing and helps preserve the integrity of both the patch and the fabric.
Conclusion
Upcycling old clothes with embroidered iron patches is a simple yet powerful way to refresh your wardrobe, reduce waste, and express your creativity. Whether you’re covering up a flaw or adding a unique touch to a plain piece, patches offer endless possibilities for personalization and style. Plus, it’s a fun and rewarding project that promotes sustainability and helps you save money.Now that you’ve got the tools, tips, and inspiration, it’s time to get started! Dig through your closet, pick out those well-loved pieces that need a little TLC, and give them a new lease on life with some creative patchwork.