
A Beginner's Guide to Patch Decorating
Do you love customizing your belongings? Do you like adding some personal touch to your clothes or accessories?
If so, then patch decorating is the perfect activity for you. Patch decorating is adding patches to clothing, bags, or any other item to give them a unique look.
This beginner's guide will walk you through things you need to know about patch decorating and how to start decorating your clothes, accessories, or any DIY projects.

Making embroidered patches is an old tradition that was initially done by hand. However, because of the discoveries of new technology, high-speed and computerized machines led to the mass production of patches. You can see embroidered patches everywhere and they come in different styles, shapes, sizes, colors, and designs.


Leather patches are available in different shapes and sizes. These patches are nice-looking, elegant, and great for business because they can make a company logo, name, or byline stand out.

Chenille comes from a French word that means caterpillar. Chenille patches are made by placing two core yarns and twisting them together. They have a similar fuzz to the top of a caterpillar, which gives them a soft and fuzzy character.
Chenille patches are often backed with stiffened felt, making it easier to attach them to fabric-like jackets. These patches are great for designs that are not too complex.

PVC patches are made of PVC (Polyvinyl chloride), a sturdy plastic that comes in various colors. PVC patches are a modern take on traditional embroidered patches. Unlike the other types of patches, PVC patches are waterproof, easy to clean, and will never fade, fray, crack, or feel. These features make PVC patches ideal for moral patches, sporting events, outdoor use, and many other things.
PVC patches come in different backing options, but the most popular is the velcro backing. These patches are great for anyone looking for unique and rugged look patches. They come in different colors and are often used in outdoor gear because they can withstand all kinds of weather, including very hot temperatures.

Choose the item you want to decorate with patches. It can be a denim jacket, backpack, or any other item you want to personalize.

If so, then patch decorating is the perfect activity for you. Patch decorating is adding patches to clothing, bags, or any other item to give them a unique look.
This beginner's guide will walk you through things you need to know about patch decorating and how to start decorating your clothes, accessories, or any DIY projects.
What is Patch Decorating?
Patch decorating is a creative way of adding style to your belongings by attaching decorative patches. These patches come in various designs, colors, and sizes and can be easily attached using sewing or iron-on techniques. From basic to intricate designs, patches can help you express your personality and give your items a personalized touch.Understanding The Different Types of Patches
Before you start patch decorating, it's essential to understand the different types of patches available. Here are some common patch types to consider:
1. Embroidered Patches
The embroidered patch is the most popular of all types of patches on the market today. An embroidered patch, also called a cloth badge, is a piece of embroidery created using a fabric backing and many threads.Making embroidered patches is an old tradition that was initially done by hand. However, because of the discoveries of new technology, high-speed and computerized machines led to the mass production of patches. You can see embroidered patches everywhere and they come in different styles, shapes, sizes, colors, and designs.
2. Woven Patches
Woven patches have a similar look to embroidery patches, but if you take a closer look, woven patches don’t have the raised look as the embroidery patches. This is because woven patches are made with thinner threads. Thinner threads make it possible to achieve greater details in the design. Woven patches are classy and stylish and come in various shapes, colors, and sizes.
3. Leather Patches
Leather patches are made of high-quality leather and are stamped, embossed, or laser engraved with a design. A leather patch can be used to repair clothes or used as an adornment. They originated from the military, especially aviator uniforms.Leather patches are available in different shapes and sizes. These patches are nice-looking, elegant, and great for business because they can make a company logo, name, or byline stand out.
4. Chenille Patches
Chenille comes from a French word that means caterpillar. Chenille patches are made by placing two core yarns and twisting them together. They have a similar fuzz to the top of a caterpillar, which gives them a soft and fuzzy character.
Chenille patches are often backed with stiffened felt, making it easier to attach them to fabric-like jackets. These patches are great for designs that are not too complex.
5. PVC Patches
PVC patches are made of PVC (Polyvinyl chloride), a sturdy plastic that comes in various colors. PVC patches are a modern take on traditional embroidered patches. Unlike the other types of patches, PVC patches are waterproof, easy to clean, and will never fade, fray, crack, or feel. These features make PVC patches ideal for moral patches, sporting events, outdoor use, and many other things.
PVC patches come in different backing options, but the most popular is the velcro backing. These patches are great for anyone looking for unique and rugged look patches. They come in different colors and are often used in outdoor gear because they can withstand all kinds of weather, including very hot temperatures.
Choosing Your Patch Design
Here are some things you need to consider when choosing a patch design:1. Personal Interests
Consider your interests and hobbies. Think what you like doing and incorporate the design into it. For example, if you love music, choose a patch with a music-related design, or if you're an animal lover, choose a patch with an animal design.2. Color Scheme
Consider the color scheme of the clothing or accessory you want to decorate. Choose a patch with colors that complement or contrast the item's colors.3. Patch Size
Consider the size of the clothes or items you want to decorate. Choose a patch proportional to the item's size and won't overwhelm it.
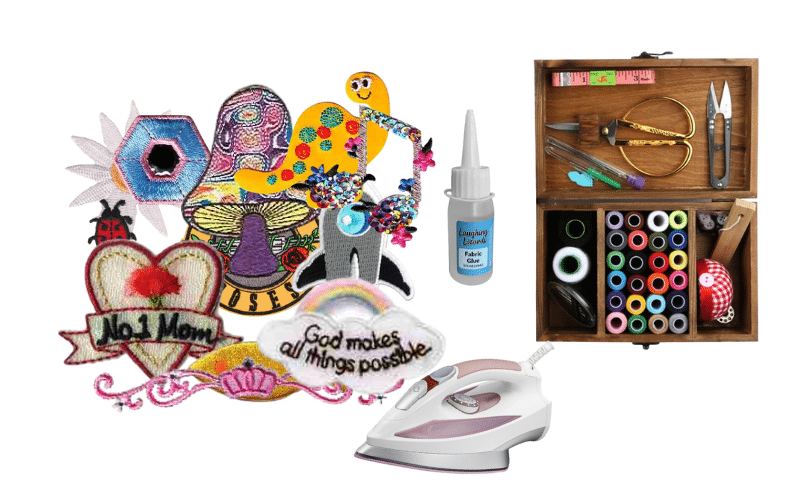
Materials Required for Patch Decorating
You will need the following materials in starting with patch decorating:- Patches: You can find patches at your local craft store or online. There are various types of patches, including embroidered patches, sequin patches, and iron-on patches.
- Clothing or Accessories: Choose an item you want to decorate with patches. It can be anything from a backpack to a denim jacket.
- Needle and Thread: If you plan to sew your patches, you will need a needle and thread to attach them.
- Iron: If you are using iron-on patches, you will need an iron to attach them to your item.
- Fabric Glue: If you’re planning to glue your patches
How to Decorate with Patches
Here are the steps to decorate your items with patches:Step 1: Choose the Item You Want to Decorate
Choose any item, fabric or material you want to decorate with patches. You can use your old clothes to give them a new look or denim jacket, pants, shoes, backpacks, scrapbooks, journals, house decor, etc.Choose the item you want to decorate with patches. It can be a denim jacket, backpack, or any other item you want to personalize.
Step 2: Choose Your Patches
Choose the patches you want to use. You can choose any design, color, and size. You can also order a custom patch that will be made only for you. Select patches that match your style and the item you are decorating.Step 3: Decide on Placement
Decide on the placement of your patches. You can place them randomly, in a pattern, or a specific design. Use pins to hold the patches in place before attaching them permanently.Step 4: Attach the Patches
Attach the patches using sewing or iron-on techniques. If you use sew-on patches, thread your needle and sew the patches onto the item. If you use iron-on patches, place the patch on top of your material, cover it with a cloth, and iron it on according to the patch's instructions.Step 5: Enjoy Your Customized Item
Enjoy your newly customized item with patches! You can wear it with pride and show off your unique style.Tips for Patch Decorating
Here are some tips to help you get started with patch decorating:- Start with small items: If you are new to patch decorating, it is better to start with smaller patches, as these are easier to apply and take off when your placement is wrong.
- Mix and match: Mix and match different patches to create a unique look. You can use sequin patches, embroidered patches, and iron-on patches together.
- Be creative: Don't be afraid to experiment with patch placement and design. Have fun, and let your creativity flow!
- Practice makes perfect: The more you practice, the better you will become at patch decorating. Keep experimenting and trying new things.