
Fun Easter DIY Crafts Using Patches
Ready for Easter? We have an easy Easter patch DIY for you and your kids to make Easter exciting. There is nothing like making your DIY crafts this Easter to get in the season's spirit. It’s a great way to bond with your little ones, and the best way to have fun this Easter is to make your own Easter outfits and decorations.
1. Easter Egg Patch Ornament
If you want to try some DIY this Easter, these dyed Easter eggs with patches are super easy to do with your kids. These colorful, surprisingly simple DIY Easter traditions are created by coloring eggs with different shades and colors and patching them with emojis for added fun. Follow these simple steps with your kids, and surely, you’ll have a great time coloring and patching eggs.

For Coloring Eggs:
- What you need:
- Large eggs
- Vinegar
- Assorted Food colors and egg dyes
Instructions for Dyeing Eggs:
Follow these easy instructions on dyeing Easter eggs to create beautiful, colorful eggs with your kids.
What you need for patching eggs:
- Glue (you can use hot glue)
- Patches


Instructions for the Patches:
Stick hot glue on the patch and stick it on the egg. That’s it! You have your DIY-patched Easter eggs.
2. Easter Egg Hunt Patched Cap
Try this easy and simple patched Easter cap that you could wear on Easter. This DIY is so easy; you can make it in a few minutes, and you have three options for applying your patch to the cap. Follow these simple instructions, and you’ll be ready for the Easter egg hunt in a few minutes.

What you need:
- Your choice of cap
- Fabric glue (if you choose to glue your patch)
- Iron and thin pressing cloth (if you want to iron on the patch)
- Needle, thread, and pin (for sewing patches)
- Patches


To glue embroidered patches on hats:
- Prepare your patch and hat. Then squeeze a layer of fabric glue onto the backside of the patch.
- Place firmly on the hat and hold for 30 seconds or more until the patch is fully attached to the cap, and you’re done!
To iron the patch on the cap:
- Ensure that the cap's fabric won’t be damaged by heat or doesn’t have high elasticity.
- Preheat your iron to the highest setting and ensure the steam is off.
- Place the cap on a flat and heat-resistant surface.
- Place your patch on the right spot and cover it with a thin pressing cloth or handkerchief.
- Firmly press the iron on the patch for 10 to 15 seconds. Be careful not to move the iron.
- Remove the iron and allow the patch to cool off before using it.
To hand sew patches on the cap:
- Select the prepared area where you want to attach the patch and secure it with pins on your cap’s fabric. Place the pin in the center of the patch.
- After securing the patch, turn the cap inside out.
- Start sewing through the cap with the needle, work your way around the patch, and continue sewing until you reach the starting point. When you get the starting point, tie the thread in a knot, and you’re done.
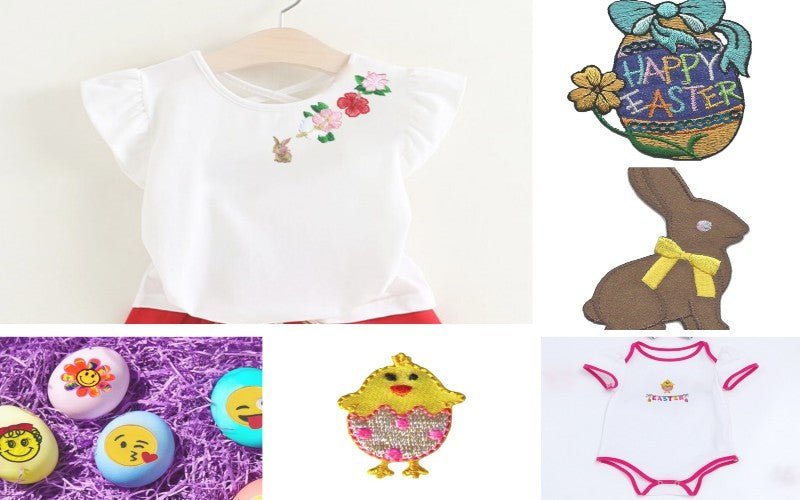
3. DIY Patched Easter Shirt
If you’re looking for creative things to do at home this Easter, then this DIY patched Easter shirt is perfect for you and your little girl. You’ll both have a great time selecting patches from our site. From start to finish, the whole process will be so much fun for both of you, and I’m sure you’ll be proud of the finished product.

Materials:
- Iron
- Thin pressing cloth or handkerchief
- Patches


Instructions:
For the best result, iron the patches one by one to the shirt to ensure it is appropriately aligned.
- Preheat the iron to the hottest setting without steam and place the shirt on a hard, flat, pressing surface.
- Using the preheated iron, preheat the area by pressing down for 20 seconds or until the area where you will place the patch feels hot (this helps with adherence).
- Position the patch and cover the design with a thin pressing cloth.
- Press straight down, holding for 30-40 seconds with constant pressure (do not move the iron back and forth), then turn the shirt inside out and repeat ironing on the inside part of the shirt.
- Repeat the process until all patches are attached to the shirt. Let it cool, and have fun wearing it on an Easter egg hunt.
4. Super Simple Felt Basket With Patches
Are you hosting an Easter party or an Easter egg hunt this year? If yes, this super simple felt basket DIY would be a fun project for you and the kids. Kids can decorate their baskets with patches and take them out for the Easter egg hunt.
This super simple Easter basket is made out of creamy white wool felt with lively stitching around its rim. The simple basket is beautiful enough, but you’ll be amazed at how perfect it will look if you add some patches to it to make it more attractive, lively, and fun. Click here for instructions on how to make this super simple felt Easter basket.

Here are our suggested patches to make this basket more attractive and fun.


5. Easter Patched Baby Onesie
Baby clothes can be pretty expensive, especially if they are custom-designed for any event. If you don't want to spend a lot of money on fully designed baby clothes for Easter that your baby will outgrow, you can make your own DIY Easter-patched baby onesie. Try creating your own baby onesie using patches and iron-on letters. This DIY project couldn't be easier, and you can customize it however you want.

Materials:
- Baby onesie
- Iron
- Thin pressing cloth
- Patches


Instructions:
- Preheat your iron by turning it up to the highest heat, and place the cloth on a hard, flat surface.
- Choose the perfect spot for your patch. Try different layouts to see which is the better place to iron a patch on.
- Place the patch on your chosen spot and cover it with a thin, pressing cloth. Place the iron downward for 20 to 45 seconds. Do not move the iron because this can shift the position of the patch.
- Once the patch is fully attached to the baby onesie, turn the onesie inside out and iron again.
- Let it cool, and you have your Easter-patched baby onesie.
There you have it. Our easy patch DIY to make your Easter exciting.
There are many other ideas online, but we thought this would be enough to help you get started. So get your creative imagination pumping and start your DIY at home using our patches. Don’t forget to share your DIY in the comment section below.