
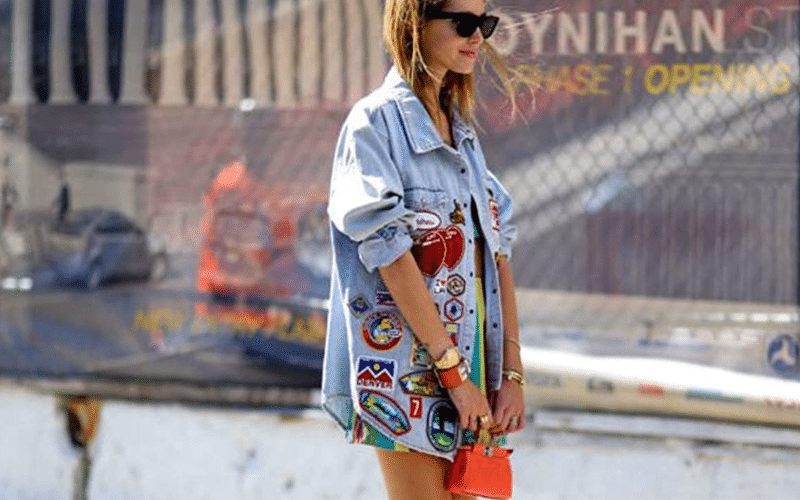
DIY Embroidered Patch Jackets: Tips And Tricks
Embroidered patch jackets have been a popular fashion statement for decades and continue to remain relevant today. An embroidered patch is a piece of cloth that has a design or message embroidered onto it. These patches can be attached to clothing, backpacks, hats, and other accessories to add a personal touch or to make a statement.
DIY embroidered patch jackets are a fun and creative way to customize your clothing and express your individuality. By creating your own embroidered patches and attaching them to a jacket, you can make a unique fashion statement that reflects your style.
There are several benefits to adding patches to your jacket.


If you create your jacket, we would love to hear about your experiences and photos of your finished product. Feel free to share your feedback and any tips for others interested in creating their own DIY embroidered patch jacket.
Thank you for reading, and happy crafting!
DIY embroidered patch jackets are a fun and creative way to customize your clothing and express your individuality. By creating your own embroidered patches and attaching them to a jacket, you can make a unique fashion statement that reflects your style.
There are several benefits to adding patches to your jacket.
- It is an affordable alternative to buying a pre-made patch jacket. Instead of spending money on a designer jacket, you can create a one-of-a-kind jacket that is unique to you.
- It allows you to express your creativity and showcase your artistic abilities. You can create any design and bring your ideas to life.
- DIY embroidered patch jackets are a sustainable fashion choice. By repurposing an old jacket and using materials, you can make an environmentally conscious fashion statement.
Materials Required for Making an Embroidered Patch Jacket
Before making your DIY embroidered patch jacket, you'll need to gather some basic materials. Here are the essential materials you'll need:- Jacket: You can use any jacket you already own or purchase a new one that suits your style. Denim jackets are popular for embroidered patch jackets, but you can also use leather, canvas, or any other sturdy material.
- Embroidered Patches: You can find patches on LaughingLizards.com or in craft stores, or create your own using fabric and embroidery floss.
- Iron, Fabric, or Needle: This depends on how you apply the patches in your jacket. You can iron, sew or glue the patches.
- Thread: If you choose to sew the patches, you will need a strong, sturdy thread that matches the color of your patches or jacket.
- Scissors: Sharp scissors are essential for cutting thread and trimming excess fabric from your patches.
- Marking Pen: A washable or disappearing ink pen will help you mark where you want your patches to be placed on your jacket.
- Ironing Board: An ironing board will provide a flat surface to iron your patches onto your jacket.
- Fabric or Baking Paper: If you iron patches into your jacket, you will need these.
Tips for Designing Embroidered Patch Jackets
You can let your creativity shine by designing your DIY embroidered patch jacket. Here are some tips to help you create a jacket that's uniquely yours:- The first step in designing your embroidered patch jacket is selecting the right jacket. Choose a jacket that fits well and reflects your style.
- Before you start attaching patches to your jacket, plan out the design. Think about the theme or message you want to convey with your patches. Sketch out a rough layout of where you want each patch to go.
- When it comes to patch placement, there are no rules. You can place patches all over your jacket, sleeves, or back. Keep in mind that some patches may look better in certain areas, depending on their shape and size.
- Choose patches that reflect your personality and interests. Mix and match patches with different colors and designs to create a unique look.
- It's important to balance the patches on your jacket so they don't overwhelm the design. A rule of thumb is to use larger patches sparingly and balance them with smaller patches. You can also use patches of different shapes and sizes to create visual interest.
How to Attach Embroidered Patches to a Jacket
Attaching embroidery patches to your jacket is a simple process requiring basic equipment and techniques. Here's how to do it:- Preparing the jacket: Before attaching the patches, ensure your jacket is clean and dry.
- Preparing the patches: If your patches have a plastic backing, carefully remove them before attaching them. You can skip this step if your patches don't have a plastic backing.
- Ironing the patches: Place the patch on the jacket where you want it to be. Use a marking pen to make sure it's centered and straight. Turn your iron to the "cotton" or "high heat" setting and let it heat up. Place a cloth or towel over the patch and press firmly with the iron for 15-20 seconds. Apply pressure to the patch's edges to ensure a secure hold.
- Sewing the patches: For added durability, you can sew the patches onto your jacket. Use a needle and thread that matches the color of the patch or jacket. Sew around the edges of the patch using a whip stitch or backstitch. This will help keep the patch in place and prevent it from coming loose.
- Embellishing the patches: Once you've attached them to your jacket, you can add embellishments like beads, sequins, or embroidery floss to make them stand out even more. Be creative and have fun with it!
Tips for Maintaining Embroidery Patches
Once you've attached embroidery patches to your jacket, taking proper care of them is essential to ensure they last a long time. Here are some tips for maintaining your embroidery patches:- Follow the manufacturer's instructions for cleaning your jacket, and avoid using harsh chemicals or bleach that can damage the patches.
- Be careful not to leave the iron on the patch too long. Excessive heat can cause the patch to shrink or melt, ruining the design.
- Avoid exposing your jacket to water, and store it in a dry place when not in use.
Conclusion
Creating a DIY embroidered patch jacket is a fun and creative way to personalize your style. Following these tips and tricks, you can easily design and attach patches to your jacket and make your unique jacket that shows off your style. Don't be afraid to experiment with different patch designs and placements, and have fun!If you create your jacket, we would love to hear about your experiences and photos of your finished product. Feel free to share your feedback and any tips for others interested in creating their own DIY embroidered patch jacket.
Thank you for reading, and happy crafting!