
How To Make Easter Decor With Iron On Patches
Looking for a fun and easy way to elevate your Easter decor this year? Whether you’re decorating your home, setting up a festive table, or personalizing an Easter basket, embroidered iron on patches are a simple and stylish way to add a unique touch, without the need for sewing!
In this blog, we will explore creative Easter decorations with patches ideas, from decorating pillow covers and table runners to crafting personalized Easter tote bags. You’ll learn step-by-step how to apply these patches correctly, plus expert tips to ensure they stay vibrant and long-lasting. By the end of this post, you’ll have plenty of inspiration to create affordable, handmade Easter decorations that add charm to your holiday celebrations.

How to Create Easter Pillow Covers:
How to Make a DIY Easter Table Runner & Napkins:
How to Customize Easter Baskets:
How to Make Easter Tote Bags:

Ready to start crafting?
Gather your favorite Easter-themed iron-on patches and get creative with your DIY decor today! Don't forget to share your finished projects. we’d love to see your festive Easter creations!
In this blog, we will explore creative Easter decorations with patches ideas, from decorating pillow covers and table runners to crafting personalized Easter tote bags. You’ll learn step-by-step how to apply these patches correctly, plus expert tips to ensure they stay vibrant and long-lasting. By the end of this post, you’ll have plenty of inspiration to create affordable, handmade Easter decorations that add charm to your holiday celebrations.
Why Use Iron On Patches for Easter Decor DIY?
If you love decorating for Easter but don’t have the time or patience for intricate DIY projects, iron on patches are the perfect solution. These versatile, no-sew embellishments make it easy to add a festive touch to your home with minimal effort. Here’s why they’re a must-have for your Easter decor:1. Quick and Easy Way to Customize Fabric-Based Decor
Iron on patches allows you to instantly upgrade plain fabric items, such as table runners, pillowcases, and tote bags, with beautiful Easter-themed designs. Unlike other crafts you don’t need advanced crafting skills, just apply heat, press, and enjoy!2. No Sewing Required
Iron on patches require zero sewing, making them ideal for crafters of all skill levels. Whether you’re decorating Easter baskets for kids or enhancing your spring home decor, you can achieve a professional look without stitching a single seam.3. Available in Adorable Easter-Themed Designs
From cute bunnies and colorful Easter eggs to spring florals and religious symbols, iron on patches come in a variety of festive designs. This makes it easy to match your decor style, whether you prefer a whimsical, pastel aesthetic or a more elegant, vintage-inspired look.4. Affordable and Versatile for Multiple Surfaces
Unlike expensive custom decor, iron on patches are budget-friendly and can be used across multiple surfaces. They adhere well to fabric items like napkins, curtains, and tote bags, but with a little creativity, they can also be applied to felt banners, canvas wall art, and even wooden signs with the right adhesive backing.Materials Needed for DIY Easter Iron-On Patches Craft
Before diving into your Easter craft projects, it’s important to gather the right materials. The good news? You won’t need a sewing machine or any advanced crafting tools, just a few simple, budget-friendly supplies to bring your ideas to life.1. Iron On Patches (Easter-Themed Designs)
The star of the project! Choose high-quality iron-on patches with Easter-inspired designs, such as:- Bunnies: A classic Easter symbol, perfect for pillows and tote bags.
- Easter Eggs: Colorful and playful, great for table linens and banners.
- Spring Florals: Think daisies, tulips, and cherry blossoms for a fresh, seasonal touch.
- Religious Symbols: Crosses, doves, and inspirational messages for a faith-based theme.
- Pastel Colors: Soft pinks, blues, yellows, and greens create a classic springtime look.
2. Fabric Items to Decorate
Iron on patches work best on fabric-based surfaces, making them a versatile choice for Easter decor. Here are a few fun items to customize:- Table Runners: Transform a plain linen or cotton runner with floral patches.
- Napkins & Placemats: Add small Easter egg or bunny patches for a coordinated tablescape.
- Tote Bags: Create personalized Easter egg hunt bags for kids by adding their names with alphabet patches.
- Pillow Covers: Give your living space a spring refresh by decorating throw pillows with festive designs.
- Fabric Banners or Wall Hangings: Make a cute Easter sign by ironing patches onto canvas or burlap.
3. Household Iron
To attach your patches securely, you’ll need either:- A regular household iron: Works well for most small to medium projects.
- A heat press machine: Ideal for larger designs or commercial-grade adhesion.
4. Parchment Paper or Pressing Cloth
Protect your fabric and patches by placing parchment paper or a pressing cloth (like a thin cotton towel) over the patch before ironing. This prevents scorch marks, melting, or excessive heat exposure.5. Scissors (for Placement Adjustments)
Before ironing, you may need to trim around the edges of your patches for a better fit or cut certain designs apart to mix and match elements creatively. A sharp pair of fabric scissors will help with precision.DIY Easter Decor Ideas with Iron On Patches
Whether you want to refresh your home decor, table settings, or Easter gifts, these easy iron-on Easter designs ideas will bring a festive touch to your space.a. Easter-Themed Pillow Covers
Give your living room or bedroom a cheerful spring makeover by decorating pillow covers with adorable Easter-themed iron-on patches.How to Create Easter Pillow Covers:
- Choose Your Pillowcase: Opt for pastel-colored or linen pillow covers to complement the soft, spring aesthetic. White, blush pink, baby blue, or soft yellow work beautifully.
- Arrange the Patches: Lay out bunny, egg, floral, or cross-shaped patches on the pillow cover before ironing. Create a symmetrical design or a scattered pattern.
- Iron Them On: Follow the patch application steps (covered in the next section), using parchment paper or a pressing cloth to protect the fabric.
- Add Embellishments: If you want extra flair, consider:
- Ribbon or lace trims along the edges.
- Fabric paint to add small polka dots or lettering.
- Small beads or faux pearls (hand-glued) for a delicate touch.
b. Customized Easter Table Runner & Napkins
Elevate your DIY Easter table decor with a beautifully designed table runner and matching napkins, decorated with iron on patches.How to Make a DIY Easter Table Runner & Napkins:
- Pick Your Fabric Base: Choose a plain linen or cotton table runner in neutral or pastel shades to create a subtle backdrop for the patches.
- Select the Patches: Floral patches work great for an elegant look, while bunnies and Easter eggs add a playful vibe.
- Arrange and Apply: Place patches along the edges of the runner or in a scattered design for a balanced look. Iron them on securely.
- Decorate Matching Napkins: Use smaller patches on fabric napkins to create a coordinated set. You can even add guests' initials with monogrammed iron-on letters.
c. Personalized Easter Baskets
Make your Easter baskets extra special by adding personalized iron on patches. Whether for kids’ egg hunts or as a decorative piece, this DIY idea adds a custom touch.How to Customize Easter Baskets:
- Choose Your Basket: You can use a woven wicker basket with a fabric liner or a soft fabric tote-style basket.
- Attach Easter-Themed Patches: Decorate the fabric lining with iron-on patches featuring bunnies, chicks, eggs, or spring flowers.
- Personalize with Names: Use monogram or alphabet iron on patches to spell out a name or initials.
- Add Extras: Tie a ribbon around the basket handle for a polished look.
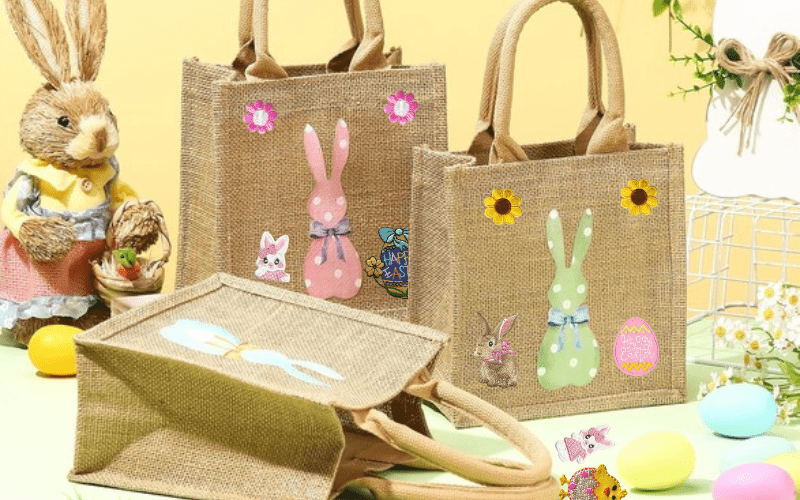
d. DIY Easter Tote Bags for Egg Hunts
Forget plastic baskets, Easter tote bags are reusable, easy to carry, and perfect for egg hunts. With just a plain canvas tote and a few iron-on patches, you can create a fun, personalized bag for kids or guests.How to Make Easter Tote Bags:
- Select a Plain Canvas Tote: Look for sturdy, lightweight fabric bags in pastel colors.
- Pick the Patches: Choose cute bunny faces, eggs, or floral designs to decorate the bag.
- Personalize with Names: Use iron on alphabet patches to add each child’s name.
- Iron Everything On: Apply the patches securely, following the proper heat settings.
- Optional Extras:
- Add pom-pom trim or lace to the edges.
- Paint the tote with glitter fabric paint for a sparkly touch.
- Use puffy iron- patches for a textured effect.
Step-by-Step Guide: How to Apply Iron-On Patches
To ensure your Easter-themed iron on patches stay securely in place and last through washes and wear, it's important to follow the proper application technique. Whether you're decorating pillows, table runners, tote bags, or Easter baskets, these simple steps will help you achieve a professional finish.Step 1: Preheat Your Iron or Heat Press
- If using a household iron, set it to medium-high heat (around 300°F or the cotton setting).
- If using a heat press, set the temperature to 300°F (150°C) for optimal adhesion.
- Turn off the steam function, moisture can interfere with the adhesive backing.
Step 2: Position the Patch on the Fabric
- Lay your fabric item on a flat, heat-resistant surface (like an ironing board).
- Arrange the iron on patch in your desired position. If working with multiple patches, place them all first to visualize the final design.
- Double-check that the patch is centered and aligned properly before applying heat.
Step 3: Cover with a Pressing Cloth or Parchment Paper
- Place a thin cotton cloth, tea towel, or parchment paper over the patch to protect both the patch and fabric from direct heat.
- This prevents the adhesive from melting too quickly and helps distribute heat evenly.
Step 4: Apply Firm Pressure for 30-45 Seconds
- If using a household iron, press firmly over the patch for 30-45 seconds, using slow circular motions. Apply steady pressure, don’t move the iron too quickly.
- If using a heat press, follow the manufacturer’s instructions and press for 15-30 seconds.
Step 5: Let It Cool Before Checking Adhesion
- Allow the fabric and patch to cool for at least 3-5 minutes before touching.
- Once cool, gently lift the edges to check if the patch is fully secured.
- If the edges are lifting, reapply heat for another 10-15 seconds.
Optional Step 6: Stitch Around the Edges for Extra Durability
For items that will be washed frequently (like napkins, tote bags, or pillow covers), consider sewing a simple border stitch around the patch for reinforcement.- Use a needle and matching thread to hand-stitch or a sewing machine for a clean finish.
- A simple zigzag or straight stitch will prevent the patch from peeling over time.
Tips for Long-Lasting Iron On Decor
To keep your Easter-themed iron on decorations looking fresh and vibrant for years to come, it’s essential to follow some simple care and maintenance tips. Whether you’re decorating pillow covers, tote bags, table linens, or Easter baskets, these guidelines will help you prevent peeling, fading, and wear.1. Wash on a Gentle Cycle If Applying to Fabric Items
If your decorated item (like napkins, table runners, tote bags, or pillow covers) is machine washable, follow these steps to ensure longevity:- Turn the fabric inside out before washing to protect the patch from friction.
- Use cold or lukewarm water on a gentle or delicate cycle to prevent the adhesive from weakening.
- Wash with similar fabrics to avoid rough textures rubbing against the patch.
2. Avoid Excessive Heat Drying to Maintain Adhesion
- Air dry whenever possible to prevent heat damage to the adhesive.
- If using a dryer, select the low-heat or tumble-dry setting.
- Avoid high-heat settings, as excessive heat can loosen the adhesive bond and cause peeling.
3. If a Patch Starts Peeling, Reapply Heat with an Iron
Over time, some patches may start to lift at the edges, especially after multiple washes. If this happens:- Lay the fabric on an ironing board and position the patch back in place.
- Cover with parchment paper or a pressing cloth to protect the surface.
- Reapply heat using a medium-high setting (300°F) and press firmly for 15-20 seconds.
- Let it cool completely before handling to ensure strong adhesion
Care Tips for Non-Fabric Decor Items
If you’ve applied iron on patches to non-fabric items (like wood signs, canvas banners, or decorative Easter baskets), consider these additional tips:- Avoid direct sunlight for long periods, as UV exposure can fade the patch colors.
- Dust regularly using a soft cloth to prevent buildup on textured patches.
- Use a protective spray sealant (for wood or canvas) to help patches stay in place.
Conclusion: Celebrate Easter with Easy DIY Decor!
Creating Easter decorations with iron on patches is a simple, fun, and beginner-friendly way to add a personalized touch to your holiday celebrations. With the right materials and a little creativity, you can design unique, long-lasting decor that can be enjoyed year after year. Plus, these projects make for thoughtful, handmade gifts for family and friends!Ready to start crafting?
Gather your favorite Easter-themed iron-on patches and get creative with your DIY decor today! Don't forget to share your finished projects. we’d love to see your festive Easter creations!