
How to Customize Your Shoes with Embroidered Iron-On Patches
Your shoes say a lot about you, but what if they could say even more? Whether you're looking to freshen up an old pair of sneakers or turn a basic pair of canvas kicks into a one-of-a-kind statement piece, embroidered iron-on patches are the ultimate DIY solution.
Customizing your shoes doesn’t have to involve expensive tools or complicated techniques. With a little creativity, a hot iron, and the right patch, you can personalize your shoes in just a few easy steps, and the results are seriously cool. From bold designs and vintage vibes to minimalist monograms or pop-culture icons, patches let you transform ordinary shoes into wearable art.
In this blog, we will walk you through everything you need to know to start customizing your footwear, from choosing the perfect patch to applying it like a pro and making it last.
Here’s why they’re ideal for shoe customization:

 Photo Credit: Meghan Klein
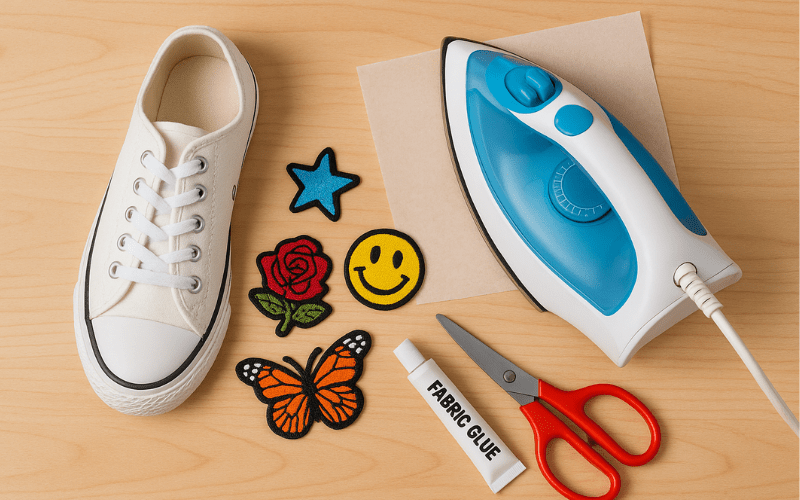
What you need for this project is:

In these super cute DIY patched sneakers, two pastel-colored sneakers were transformed into attractive and colorful patched sneakers that matched the owner's personality.
Here are some tips on applying patches to your sneakers.


Here’s how to keep your patched shoes in top condition:
So don’t wait, grab a patch, heat that iron, and start customizing. The only limit is your imagination.
Ready to Create Your Patched Masterpiece?
Shop our latest embroidered patches now
Customizing your shoes doesn’t have to involve expensive tools or complicated techniques. With a little creativity, a hot iron, and the right patch, you can personalize your shoes in just a few easy steps, and the results are seriously cool. From bold designs and vintage vibes to minimalist monograms or pop-culture icons, patches let you transform ordinary shoes into wearable art.
In this blog, we will walk you through everything you need to know to start customizing your footwear, from choosing the perfect patch to applying it like a pro and making it last.
Why Embroidered Iron-On Patches Are Perfect for Shoe Customization
Not all patches are created equal, and when it comes to decorating your shoes, embroidered iron-on patches hit the sweet spot between style, durability, and ease of use.Here’s why they’re ideal for shoe customization:
1. Durability that Lasts
Embroidered patches are made from tightly stitched threads that hold their shape and color over time. When properly applied, they can stand up to regular wear and tear, making them a great match for canvas sneakers, denim shoes, and even some faux leather surfaces.2. Instant Personal Style
Looking to add your initials, your favorite band logo, or a retro patch with attitude? Patches give you an easy way to turn generic shoes into personalized footwear that reflects your vibe.3. No Sewing Needed
The iron-on backing makes them incredibly easy to apply; no stitching or fancy equipment is required. All you need is a household iron, a bit of pressure, and a minute of your time.4. A Stylish Sustainability Hack
Instead of tossing out scuffed or boring shoes, give them new life with custom patches. It’s a great way to upcycle old shoes while reducing waste and saving money.
What You’ll Need to Get Started
Before you jump into customizing your kicks, let’s make sure you have the right tools for the job. Applying embroidered iron-on patches is simple, but having the correct setup will ensure a clean, long-lasting finish.1. Essentials
- Embroidered Iron-On Patches
- A Household Iron
- Parchment Paper or a Pressing Cloth (Place this over the patch while pressing to protect both the patch and the shoe’s material)
- Shoes to Customize (Best surfaces include canvas, denim, and faux leather. Avoid mesh, stretchy fabric, or shoes with lots of curves (like running shoes), as patches may not adhere well.
- Fabric Glue (Reinforce edges for added durability)
- Needle & Thread (A few discreet stitches along the edges can make your design extra long-lasting.)
Choosing the Right Patch for Your Shoes
Choosing the right patch is half the fun and a big part of getting a polished, cohesive look. Whether you want bold statements or subtle flair, the right design can instantly elevate your shoes.1. Match the Patch to Your Shoe Type
Not every patch fits every shoe. Here’s a quick guide:- Canvas or denim sneakers: Almost any embroidered iron-on patch will work. Flat surfaces are ideal.
- Faux leather: Choose smaller patches and use extra heat or glue.
- High-top sneakers: Use larger or vertical patches to maximize space.
- Slip-ons: Consider toecap or side placements for visibility.
2. Pick a Theme or Message
What do you want your shoes to say?- Minimalist: Initials, simple icons, small shapes
- Statement makers: Bold colors, slogans, or artwork
- Pop culture fans: Anime, music, memes, or retro patches
- Matching sets: Use mirrored patches on left/right shoes for balance
Step-by-Step Guide: How to Iron-On Patches to Shoes
Now that you’ve picked the perfect patches, it’s time to apply them. Here’s a foolproof, step-by-step guide to help you add embroidered iron-on patches to your shoes and make sure they stay put.1. Clean the Surface
Before you begin, make sure the shoe area where you’ll apply the patch is clean and dry. Wipe away dust, oils, or debris with a damp cloth. Let it dry fully.2. Preheat the Shoe Surface
Turn on your iron and set it to medium-high heat (around 300°F / 150°C) with no steam. Press the iron directly on the area where the patch will go for about 5–10 seconds to warm it up — this helps activate the adhesive faster.3. Position Your Patch
Place the patch exactly where you want it. For curved shoes or uneven surfaces, use small sewing pins or double-sided tape to hold it steady. Double-check alignment before moving on.4. Cover with Parchment Paper or Cloth
To protect both the patch and your shoe material, place a piece of parchment paper (or a thin pressing cloth) over the patch.5. Apply Firm, Even Pressure for 20–30 Seconds
Press the iron down firmly over the patch for 20–30 seconds, making sure to apply pressure evenly across the entire patch. For larger patches, move the iron slightly to cover all areas.6. Let It Cool Completely
Once you’re done pressing, allow the patch and shoe to cool for at least 2 minutes. Don’t touch or move the patch during this time; it helps the glue set.7. Check Edges + Reinforce if Needed
Gently tug the edges. If any corners lift, repeat the ironing step or apply a small amount of fabric glue underneath. For heavy-use shoes, consider stitching around the border for added durability.Tips
- Test a small, hidden part of the shoe with your iron first if you're unsure about heat sensitivity.
- Applying from inside the shoe (when possible) gives stronger adhesion.
- Let patches sit for 24 hours before wearing or cleaning.
Creative Patch Placement Ideas for Shoes
1. DIY Embellished Shoes With Embroidered Patches
These DIY embellished shoes with embroidered patches are perfect for any occasion. The classic embroidered rose patches perfectly matched the Gucci-inspired effect. All you need to turn your shoes into something interesting that matches your styles are shoes, embroidered patches, and fabric glue. The process is simple, but the results are amazing. Photo Credit: Meghan Klein
2. DIY Patch Patterned Sneakers
You'll surely love these super cute DIY patch patterned sneakers. This is an easy project that your kids will like because the result is so amazing.What you need for this project is:
- Sneakers
- Fabric glue
- Embroidered patches
- Rainbow or colorful shoelaces (optional)
- Make sure your sneakers are clean from dust or dirt.
- Figure out the placement of your patches.
- Once you've figured out where you want to put them, apply fabric glue at the back of the patches and stick them in place. Hold down for a few minutes to ensure it sticks to the sneakers.
- Wait for the glue to dry out completely before wearing them. For more colorful sneakers, use rainbow or colored laces.

3. Easy DIY Patched Sneakers
If you like patches and pins and have a bunch of them lying around? Why not do some creative DIY by turning your old pair of boring sneakers into colorful, cute, and fun ones?In these super cute DIY patched sneakers, two pastel-colored sneakers were transformed into attractive and colorful patched sneakers that matched the owner's personality.
Here are some tips on applying patches to your sneakers.
- Before applying the patches, figure out the placement of your patches.
- Work fast, as the glue will harden quickly.
- Add a little glue to the edge of the patches to ensure they stick to the sneakers.
- Make sure the glue is dry before using the sneakers.

4. Vans Shoes Makeover
Upcycling your pair of shoes into something trendy is super easy and cheap. All you need is your creativity and some patches. There are two ways to attach patches to your old pair of shoes. These van's makeovers are ultra cool, and everyone can wear them because they're unisex. But if you want a DIY van's shoe makeover with a feminine touch, you can use flower patches or an embroidered rose patch.
Caring for Your Patched Shoes
You’ve done the fun part; now it’s time to protect your custom kicks. Proper care ensures that your embroidered patches stay vibrant, secure, and looking fresh, even after daily wear.Here’s how to keep your patched shoes in top condition:
1. Spot Clean Only
Avoid tossing your patched shoes in the washer. Instead:- Use a soft brush or a damp cloth with mild soap
- Gently scrub around the patch, not directly on the stitches
- Pat dry with a towel
2. Avoid Excessive Heat or Moisture
Heat and humidity can soften the patch glue and cause peeling.- Don’t leave shoes in a hot car or dryer
- Keep them in a cool, dry place when not in use
3. Reinforce with Stitching or Fabric Glue (Optional but Smart)
If you notice corners curling or lifting, apply a small dab of fabric glue or stitch around the edge with matching thread.4. Rotate Your Shoes
Just like with any custom shoes, giving them a break between wears extends their life and reduces stress on the patches.5. Don’t Scrub the Threads
While the threads are durable, embroidered patches can fade if scrubbed aggressively. For long-term vibrancy, treat them like you would a printed graphic tee, with care.Conclusion: Make Your Mark — One Patch at a Time
With just a few simple tools and the right embroidered iron-on patches, you’ve got everything you need to turn ordinary shoes into custom, one-of-a-kind creations. Whether you’re expressing your personality, reviving a worn pair of sneakers, or just having fun with fashion, patching is an easy, affordable way to stand out from the crowd.So don’t wait, grab a patch, heat that iron, and start customizing. The only limit is your imagination.
Ready to Create Your Patched Masterpiece?
Shop our latest embroidered patches now